Introduction
Chatbots have firmly integrated into our lives as a convenient interface for user interaction with products, as dialogue is a natural and familiar way for humans to convey their thoughts. Chatbots are particularly popular in messengers, which are common places for communication. On the other hand, other platforms for hosting chatbots, such as a chat widget on a website, also play an important role. Typically, a user's first encounter with a company occurs on the website, and additional functionality in the form of a chatbot enhances the overall impression.
Often, the implementation of such a widget is based on the WebSocket protocol, which facilitates two-way communication between the client and the server. In this article, we would like to focus on the backend part of such a chat widget using the popular FastAPI framework.
Practical Part
Preparation
First, let's review the FastAPI documentation [1] on WebSocket support. The provided example showcases the framework’s capabilities, but unfortunately, it is not suitable for industrial development – the session information is encapsulated within a single connection manager object, which is stored in memory and operates within a single process. Thus, this:
- Prevents seamless updating of the bot to a new version, as restarting would result in the loss of active session information;
- Increases code coupling, which can cause difficulties when scaling the system, for example, if you need to distribute functionality across microservices.
Therefore, we will follow the advice from the same documentation and use the broadcaster [2] library to apply the publisher-subscriber or Pub/Sub message passing design pattern. Using such a pattern will offload the responsibility of message management from the service and isolate system components from each other. In this case, each user’s session will be represented by separate topics.
The presented library supports the following message brokers: Redis PUB/SUB, Redis Streams, Apache Kafka, and Postgres LISTEN/NOTIFY. In our example, we will use Redis PUB/SUB, but you can choose another.
Deployment of the System
Now we need to decide how to deploy the system. Obviously, we need to set up two services: the NoSQL database Redis and the chatbot service. To do this, we will use the docker-compose utility, which deploys multi-container applications.
First, we need to define a Dockerfile for the chatbot service, which will be used to build the image:
FROM python:3.12-slim
# install dependencies
COPY ci/requirements.txt .
RUN pip3 install --no-cache-dir -r requirements.txt
# copy codebase
COPY src /src
WORKDIR /src
EXPOSE 8000
ENTRYPOINT [ "python3", "api_app.py" ]
In the provided Dockerfile description:
- Base Image: We use the official Python image [3] as the base.
- Install Dependencies: We install dependencies using the pip package manager.
- Copy Codebase: We copy the codebase into the container.
- Expose Port: We specify the port that the container will listen to.
- Set Entry Point: We define the entry point for the container.
The final step is to define our system configuration in docker-compose.yaml:
services:
chatbot:
build:
context: .
dockerfile: ci/Dockerfile
image: $REPOSITORY:$TAG
networks:
- chat
ports:
- "8000:8000"
redis:
image: redis:7.4
networks:
- chat
ports:
- "6379:6379"
volumes:
- redis-data:/data
command: ["redis-server"]
networks:
chat:
driver: bridge
volumes:
redis-data:
external: true
Key points in the provided configuration:
- Shared Network: Services are in the same chat network, allowing them to communicate with each other.
- Published Ports: Ports are published for each service to enable interaction.
- External Volume: An external volume is created for storing Redis data.
Implementation
After deciding on the deployment, we proceed to the implementation. The entire subsequent code is available in the repository [4].
First, let’s define the necessary dependencies (ci/requirements.txt):
broadcaster[redis]==0.3.1 # websocket chats
fastapi==0.110.3 # API
uvicorn==0.29.0 # ASGI web server
websockets==13.0 # websoket chats
Next, let’s proceed to the code by creating an object for publishing and subscribing to our topics (src/redis_broadcaster.py):
"""Redis broadcaster."""
from broadcaster import Broadcast
DB_URI = "redis://redis:6379"
broadcast = Broadcast(DB_URI)
Now, define the entry point with the initialization of our FastAPI application (src/api_app.py):
"""API App entry point."""
import uvicorn
from fastapi import FastAPI
from lifespan_events import lifespan
from websocket_chat import websocket_chat_router
app = FastAPI(
title="Chatbot",
description="Pub/Sub Chatbot",
lifespan=lifespan,
)
app.include_router(websocket_chat_router)
if __name__ == "__main__":
uvicorn.run(app, host="0.0.0.0")
Here, it’s important to focus on the imports:
- From lifespan_events import lifespan;
- From websocket_chat import websocket_chat_router.
The first imported module handles events that occur before the application starts and after it shuts down. In our case, we need to first connect to the message broker and then disconnect from it (src/lifespan_events.py):
"""Lifespan events."""
from contextlib import asynccontextmanager
from fastapi import FastAPI
from redis_broadcaster import broadcast
@asynccontextmanager
async def lifespan(app: FastAPI):
"""
Manage the lifespan of a FastAPI application.
This function connects to a broadcast system at the start of the application
and disconnects from it when the application shuts down.
Args:
app (FastAPI): The FastAPI application instance.
Yields:
None: This context manager does not yield any values.
"""
await broadcast.connect()
yield
await broadcast.disconnect()
The second imported package handles the business logic of the chatbot based on WebSocket. It includes three submodules:
1) Declares the WebSocket endpoint (src/websocket_chat/routers.py):
"""Websocket chat router."""
from fastapi import APIRouter, WebSocket
from starlette.concurrency import run_until_first_complete
from .pub_sub import chat_ws_receiver, chat_ws_sender
websocket_chat_router = APIRouter()
@websocket_chat_router.websocket("/chatbot/{chat_id}")
async def websocket_endpoint(websocket: WebSocket, chat_id: str):
"""
Handle websocket chat connections.
Args:
websocket (WebSocket): The WebSocket connection instance.
chat_id (str): The identifier for the chat session.
"""
await websocket.accept()
await run_until_first_complete(
(chat_ws_receiver, {"websocket": websocket, "chat_id": chat_id}),
(chat_ws_sender, {"websocket": websocket, "chat_id": chat_id}),
)
2) Handles the publishing and subscribing logic (src/websocket_chat/pub_sub.py):
"""PUB/SUB."""
from fastapi import WebSocket
from redis_broadcaster import broadcast
from .bot import get_response_from_bot
async def chat_ws_receiver(websocket: WebSocket, chat_id: str) -> None:
"""
Receive messages from a WebSocket connection and broadcasts responses.
This function listens for incoming text messages from a WebSocket connection,
generates a response using the bot, and publishes the response to a broadcast
channel.
Args:
websocket (WebSocket): The WebSocket connection to receive messages from.
chat_id (str): The identifier of the chat channel for broadcasting messages.
Returns:
None
"""
async for message in websocket.iter_text():
response_message = get_response_from_bot(message)
await broadcast.publish(channel=chat_id, message=response_message)
async def chat_ws_sender(websocket: WebSocket, chat_id: str) -> None:
"""
Send messages from a broadcast channel to a WebSocket connection.
This function subscribes to a broadcast channel and sends any received messages
to the connected WebSocket client.
Args:
websocket (WebSocket): The WebSocket connection to send messages to.
chat_id (str): The identifier of the chat channel to subscribe to.
Returns:
None
"""
async with broadcast.subscribe(channel=chat_id) as subscriber:
async for event in subscriber:
await websocket.send_text(event.message)
3) Emulates the bot's response logic (src/websocket_chat/bot.py):
"""Bot."""
def get_response_from_bot(user_message: str) -> str:
"""
Generate a response from the bot based on the user's message.
Args:
user_message (str): The message received from the user.
Returns:
str: A formatted response from the bot.
"""
return f"BOT: {user_message}"
In the end, we have an echo-bot, but in reality, this functionality represents a growth point for the system. You can take this template and implement the third module yourself – up to the point where message publishing to a topic can occur in another service responsible for the bot's internal logic. This way, you achieve communication between two services through a message broker, which is a good practice.
Running the Chatbot
Finally, it's time to launch our bot. To do this:
- Build the image: docker compose build chatbot;
- Create an external volume: docker create volume redis-data;
- Run the services: docker compose up.
As a client, we will use Postman – create a new WebSocket connection: File -> New... -> WebSocket, enter the correct URL: ws://localhost:8000/chatbot/1, and click the Connect button. If everything is done correctly, the status Connected should appear (Fig. 1):
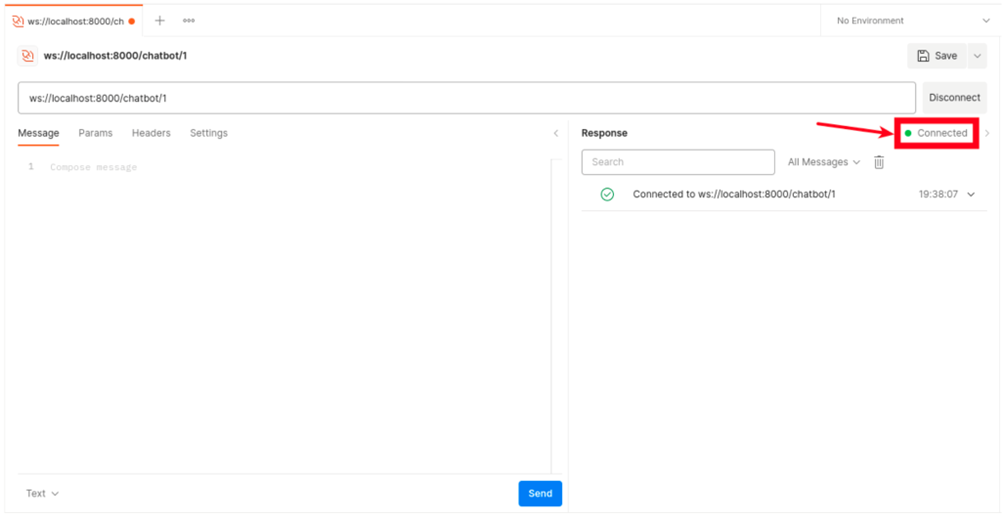
Fig. 1. Step 1 – WebSocket connection
Now, let’s interact with the bot – enter our message in the left form and click Send (Fig. 2):
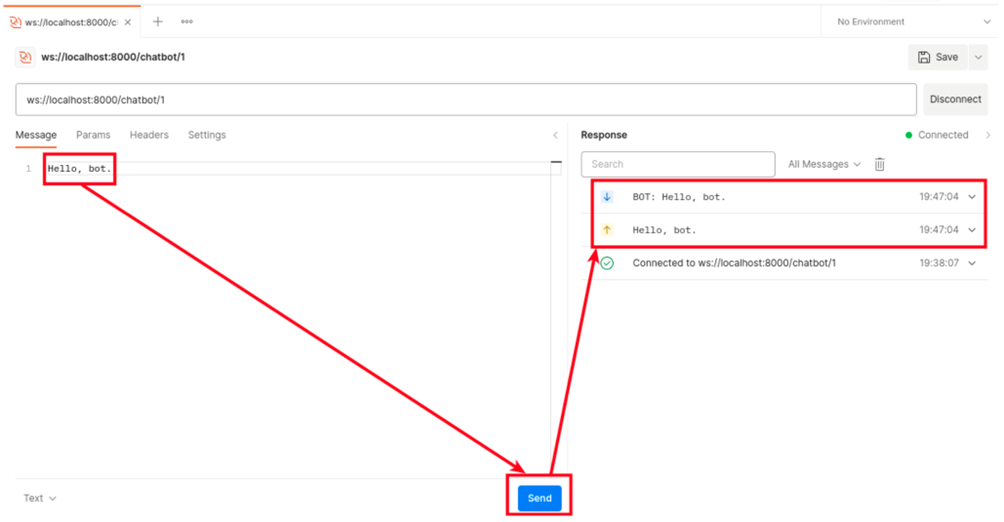
Fig. 2. Step 2 – User interaction with the Bot
The bot responded, and optionally, you can continue the conversation.
Finally, let’s take a look at Redis to see what has been recorded. For this, we use the GUI application Redis Insight. In the welcome window, set up a connection to our database (Fig. 3):
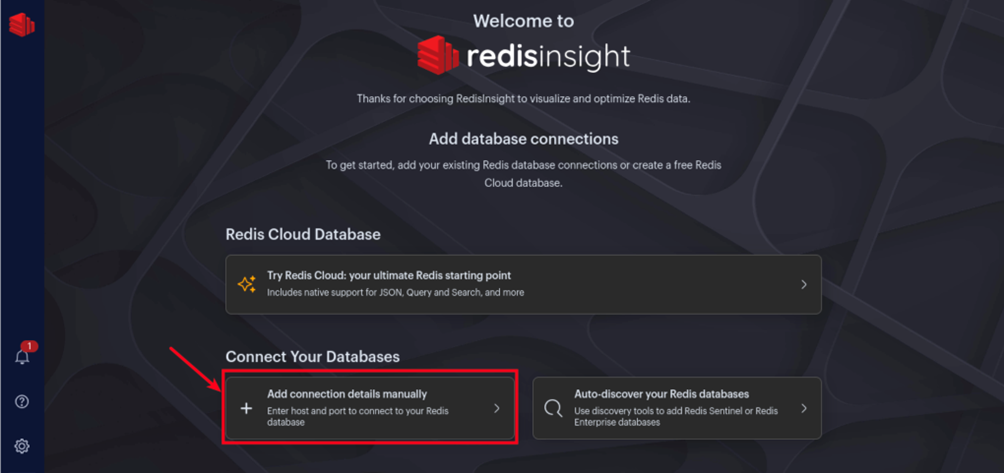
Fig. 3. Step 3 – Connection to database using Redis Insight
In the next window, you can leave everything as is and simply click Add Redis Database. After that, you will be taken to the list of connections, where your database will be displayed. To view the data, click on the corresponding entry, select Pub/Sub on the left panel, and click the Subscribe button (Fig. 4):
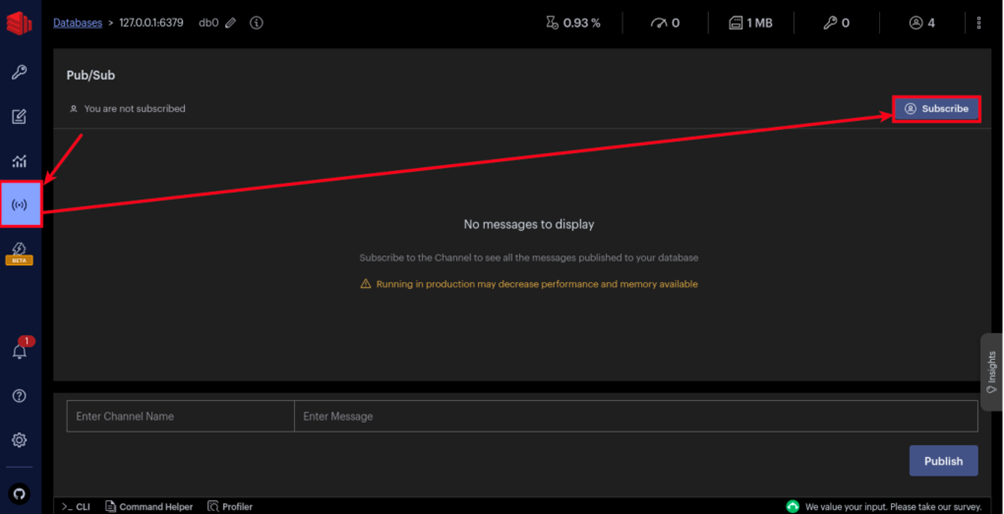
Fig. 4. Step 4 – Subscribe to the database
These actions will allow messages from all topics to be displayed. Let’s verify this by sending another message in Postman. If everything is done correctly, you will see a new message from the bot in Redis Insight with the topic set – achieving a one-way message transmission through the broker.
Thus, we have obtained an extended version of the FastAPI documentation chatbot, which is now easier to scale and deploy in different environments.
Conclusion
In this work, we successfully implemented a scalable chatbot system using the FastAPI framework and the Pub/Sub messaging pattern with Redis PUB/SUB. The architecture addresses common challenges in WebSocket management, such as session persistence and system scalability. The system is deployed using Docker Compose, which ensures easy setup and potential expansion. This foundational setup allows for the implementation of more complex functionalities, such as multi-service communication through message brokers, providing a robust solution for real-time applications.